
前排提醒:由于是Linux,所以图片不会有太多,敬请原谅。
Step1 下载
首先进入这个网页:
接着,下滑找到“Linux 服务器端”,复制下载链接。我建议使用7.0.5版本的,因为7.1.5版本的在启动seahub的时候会出现一些奇怪的错误。然后,将它下载到你的系统下。
或者,如果你懒,可以直接复制下面的命令并运行
wget --no-check-certificate http://seafile-downloads.oss-cn-shanghai.aliyuncs.com/seafile-server_7.0.5_x86-64.tar.gzStep2 开始部署
在本步骤中,高手可以直接使用命令行操作,小白可以安装完宝塔后用宝塔操作。如何安装?戳下面
首先,转到root账户。先建一个文件夹,并且记住这个文件夹的位置。举个粒子,我在根目录下建了个cloudpan文件夹,即运行如下命令
cd /
mkdir cloudpan
然后,将安装包给复制进来
mv /seafile-server_7.0.5_x86-64.tar.gz /cloudpan/in.tar.gz下一步,解压
cd cloudpan
tar -xvzf in.tar.gz在这一步进行完之后,你就可以把安装包删掉了,并且在cloudpan目录下会出现名叫seafile-server-7..的文件夹。进入这个文件夹,准备安装。
在安装之前,你得先安装sqlite3。
Ubuntu/Debian命令如下
apt install sqlite3
终于,你可以正式安装seafile了。运行setup-seafile.sh这个脚本
./setup-seafile.shStep3 正式安装
首先,运行脚本后,出现这些东西:
-----------------------------------------------------------------
This script will guide you to config and setup your seafile server.

Make sure you have read seafile server manual at

    https://github.com/haiwen/seafile/wiki

Note: This script will guide your to setup seafile server using sqlite3,
which may have problems if your disk is on a NFS/CIFS/USB.
In these cases, we suggest you setup seafile server using MySQL.

Press [ENTER] to continue
-----------------------------------------------------------------
按回车,接着,安装脚本会检测环境,如果有什么东西没有安装的就自行安装就好了
Checking packages needed by seafile ...

Checking python on this machine ...
Find python: python2.7

  Checking python module: python-sqlite3 ... Done.

Checking for sqlite3 ...Done.

Checking Done.
检测完毕后,首先你得输入你的服务器名字,自己取就可以了
What would you like to use as the name of this seafile server?
Your seafile users will be able to see the name in their seafile client.
You can use a-z, A-Z, 0-9, _ and -, and the length should be 3 ~ 15
[server name]:
我就取:seafile_server吧!注意,输入时要一气呵成,不然就要推到重来。接下来,输入你的域名或者是ip地址:
What is the ip or domain of this server?
For example, www.mycompany.com, or, 192.168.1.101

[This server's ip or domain]:
如果没有域名的,先输入ip地址凑合着用用,但是后面将无法开启HTTPS。最后,使劲按回车。当然,如果你想自定义安装位置等信息的可以自行设置。
Where would you like to store your seafile data?
Note: Please use a volume with enough free space.
[default: /cloudpan/seafile-data ]

What tcp port do you want to use for seafile fileserver?
8082 is the recommended port.
[default: 8082 ]


This is your config information:

server name:        ssssssss
server ip/domain:   hk.stephen-zeng.top
seafile data dir:   /cloudpan/seafile-data
fileserver port:    8082

If you are OK with the configuration, press [ENTER] to continue.

Generating ccnet configuration in /cloudpan/ccnet...

done
Successly create configuration dir /cloudpan/ccnet.

Generating seafile configuration in /cloudpan/seafile-data ...

Done.

-----------------------------------------------------------------
Seahub is the web interface for seafile server.
Now let's setup seahub configuration. Press [ENTER] to continue
-----------------------------------------------------------------


Creating database now, it may take one minute, please wait...

/cloudpan/seafile-server-7.0.5

Done.

creating seafile-server-latest symbolic link ... done


-----------------------------------------------------------------
Your seafile server configuration has been completed successfully.
-----------------------------------------------------------------

run seafile server:     ./seafile.sh { start | stop | restart }
run seahub  server:     ./seahub.sh  { start <port> | stop | restart <port> }

-----------------------------------------------------------------
If the server is behind a firewall, remember to open these tcp ports:
-----------------------------------------------------------------

port of seafile fileserver:   8082
port of seahub:               8000

When problems occur, refer to

      https://github.com/haiwen/seafile/wiki

for more information.
Step 4 开始运行
安装完之后,不要着急运行,先将系统重启。如果不重启,就会出现一些奇奇怪怪的错误。
待重启完成后,先进入你的cloudpan文件夹内,再ls一下,会出现以下文件夹及文件:
ccnet conf seafile-data seafile-server-7.0.5 seafile-server-latest seahub-data seahub.db首先进入conf文件夹,修改其中的gunicorn.conf文件
cd conf
nano gunicorn.conf
接着,将这一行
bind = "127.0.0.1:8000"改成这样子:
bind = "0.0.0.0:8000"保存,退出。改这个的目的是关闭ip屏蔽,不然就只能使用HTTPS进行反向代理访问。最后,万事俱备,只欠东风。进入seafile-server-7..文件夹内:
cd ../seafile-server-7.0.5分别运行seafile.sh和seahub.sh
./seafile.sh start
./seahub.sh start
在运行seahub.sh时,脚本会让你先设置管理员账号:
----------------------------------------
It's the first time you start the seafile server. Now let's create the admin account
----------------------------------------

What is the email for the admin account?
[ admin email ]

What is the password for the admin account?
[ admin password ]

Enter the password again:
[ admin password again ]


----------------------------------------
Successfully created seafile admin
----------------------------------------
按照他的指示,先设定管理员邮箱,再设定管理员密码即可。最后,你需要到你的防火墙中放行8000和8082接口,我就在宝塔上放了吧。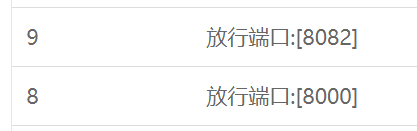
Step Last 开始享受吧
输入域名(IP)+:8000,像这样:
hk.stephen-zeng.top:8000
然后,enjoy yourself !
附录
注意,在客户端中,请输入域名(IP)+:8000来登录客户端啊。
总结
Linux的部署就是这样了,下一篇我们来聊聊Windows的部署吧。下篇见!